

Backing up Odoo Database is core of the data loss prevention action. Once you had a problem with your production build, or, having a hardware failure upon your server, you can always retrieve what you loss using your backup file. In this case, the entire Odoo database. This article will walk through on how to backup and restore large odoo database through backend.
There are several factor that might causing the backup and restoring database difficult. One of the problem is the growing size of the database itself. We know that, backing up and restoring database through Odoo database manager page is recommended ways by the Odoo community itself, but as the database size grows over time, it tends to fail on the progress. The cause is vary, it might because of the web server limitation as Nginx or Apache has the time limit, or maybe caused by the odoo.conf file which doesn’t properly configured to take large files, etc.
Now, as I walk along passage of time, I finally found the most ideal ways to backup and restore the database. I experienced a huge database size backup and restore as big as 12GB of database. My method of backing up and restoring database is tested many times and, I can say this one is the best method for doing so.
Prerequisite
This backup and restore will require you an access to the backend side of the Odoo, such as :
- Postgresql access
- odoo.conf password
- Sudo access of linux
- Non operating hour
Backing up Large Odoo Database
- Access your Linux terminal, either from SSH or your server directly. Login through your superuser account (root) of the Linux.
- After successfully login, switch to postgresql by typing in :
su - postgres - Then, access the psql by typing in :
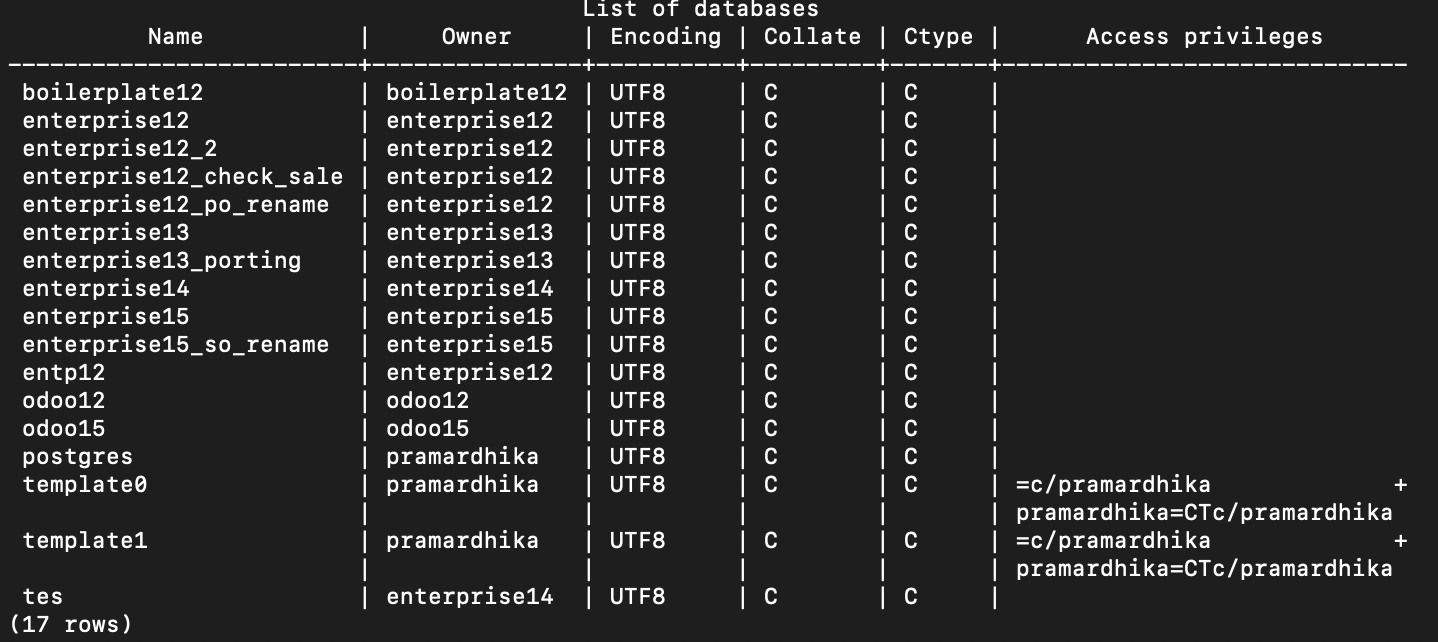
psql - Type in \l (small L letter) to see the list of your database. You need to know which database you are going to back up. So here you can see all the database name. Try to identify which one, and for this case we going to backup a database with the name odoo12.
- Press q to exit this view, and type in \q to exit psql.
- Now, we are in the level of postgresql account. We can simply dump the database we want by typing in :
pg_dump –format=c odoo12 > odoo_12_file_backup.dump
odoo12 is the database name, and odoo_12_file_backup.dump is a filename that the backup will be saved. It also has a .dump extension file. Press enter, and wait for the backup progress done. - After it’s done, type in ls (small L and S letter) to see the current directory where you are into, because the backup file is in the same location as you are. Now, you can put this file somewhere else. You can save it to your google drive, USB drive, or somewhere save.
- That’s only 50% of the progress of backing up your database, now you still need to do one thing which is backing up the filestore manually. Filestore is a folder where odoo system is saving documents or images that user uploaded in Odoo. But before doing so, you need to stop the odoo process that running in your server. This will cause your Odoo inaccessible for a while, so make sure to check that it’s beyond the user operational hour so it doesn’t disturb their work hour.
To stop the process, type in :service odoo stop
- Now, go to where the filestore as default is saved inside /odoo/.local/share/Odoo/filestore. You can head to this folder by typing :
cd /odoo/.local/share/Odoo/filestore
The filestore has the same name with your selected database. In this case, the odoo12 folder is the filestore name of the odoo12 database. Same goes with the .dump files, copy this file somewhere else. - Also, don’t forget to save the custom addons or module that is installed in the machine by going into /odoo/.local/share/Odoo/addons. Just copy all of the folder that appear here, and put somewhere save just like the filestore.
- After you done copying, bring up the odoo service again by typing in :
service odoo start - Now the backup process is done.
Restore Large Odoo Database
- Access your Linux terminal, either from SSH or your server directly. Login through your superuser account (root) of the Linux.
- After that, go to odoo.conf by typing :
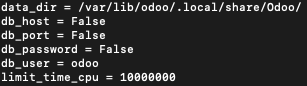
nano /etc/odoo/odoo.conf - In this file, go find db_user value. In this case, the db_user value is “odoo”. That means, the user inside this machine that has responsible connecting odoo instance to postgresql database is a user named “odoo”. You also need to remember the value of data_dir location, because this is the place where you will place your odoo addons and filestore.
- Then, exit the odoo.conf file by pressing ctrl + x. Later on, get into the postgresql user by typing
su – postgres - Access the psql by typing :
psql - Now here, we are going to create a database. Assume that in previous machine we have odoo12 database, we can now still using odoo12 as the name or picking a new one. For convenience of this tutorial, we are going to use the old name. Type in this command :
CREATE DATABASE odoo12; - After creating database name, exit psql by typing \q. Now, since we are in the postgresql level account, we can begin to restore the database provided by .dump files to that new machine. Type this to backup the database :
pg_restore -O x -d odoo12 < odoo_12_file_backup.dump
Also, make sure that you are in the same level location where you put your .dump backup file. - Now, once the restore process is finished, if you access your odoo website you may now see odoo12 appeared. But in this case, DO NOT login or clicking that database because we are not yet restoring the filestore. If you are entering or login or clicking that database before restoring filestore, the icons and files in your Odoo will disappear.
- Currently, we need to restore the filestore file which has been backed up from the backup progress to the machine. If the backup file is not in the machine, you can try to do a SSH remote into the server, go to the data_dir value that you acquire from the step number 2, and copy-paste your filestore folder into that directory. To remind you, the directory is /odoo/.local/share/Odoo/filestore/
- Once the copy-paste process is done, rename your folder to the same name as the database, which is odoo12. Now, from the CLI backend side, we need to assign the owner of the file to whom we find the name on the step 2, which is “odoo” by typing :
chown odoo:odoo odoo12
here, odoo:odoo means the user and the group, and odoo12 is the folder name. - Later on, we give the privilege to the odoo12 folder so “odoo” user can read and write to that folder once user from browser are uploading files, by typing in :
chmod -R 777 odoo12 - We also need to restore the custom addons inside it’s folder. Do the same step as number 8 by copy-paste your addons into /odoo/.local/share/Odoo/addons folder.
- Once everything is done, you can proceed to login to your Odoo from browser as usual. Try to check if all icons is not broken or missing. If it’s broken, you may miss several step that needed to be done.